I’ve been wanting to share this one for a while. If you’ve ever needed to generate professional-looking Word or PDF documents from Power Automate — complete with icons, tables, and styled headers — without reaching for premium connectors or fiddly Word templates, this approach might just change how you think about document generation. The trick? HTML that Word understands.
In this post, I’m going to walk through the entire flow step by step, explain the key patterns that make it work, and show you the finished output. Let’s get into it.
The Big Picture — What This Flow Does
At a high level, this flow takes structured data (in this case, a list of Microsoft Power Platform products), builds a richly styled HTML document, and then outputs it in two formats simultaneously — a .doc file saved to SharePoint and a .pdf file also saved to SharePoint (via a OneDrive conversion trick).
The entire flow lives inside a single Scope action called ScopeGenerateDocsAsHTML. I like to wrap flows like this in a scope because it keeps things tidy and makes the flow portable — you can copy the scope and paste it into another flow.
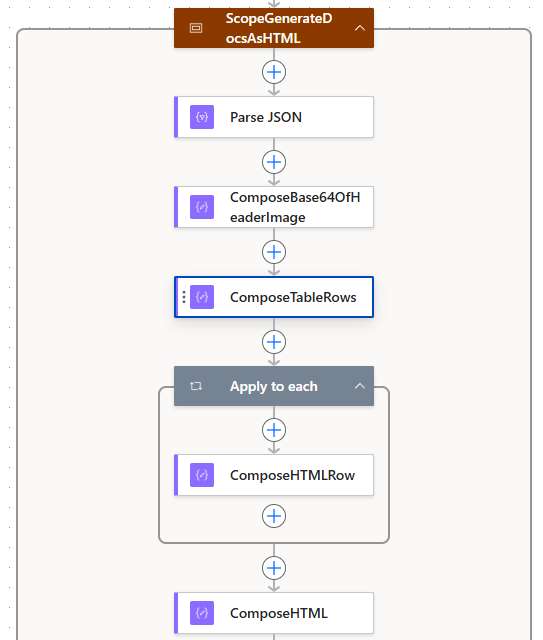
Parse JSON — Centralising Your Configuration
The first action inside the scope is a Parse JSON action. Rather than scattering hardcoded values across the flow, I use this action as a configuration block. It stores four key settings:
- SharePoint Site URL — the target site where documents get saved
- SharePoint Folder Path — the document library folder
- OneDrive Folder Path — a temporary folder used during PDF conversion
- FileDate — a timestamp generated with
utcnow()to give each file a unique name
{
  "SharePoint Site URL": "https://contoso.sharepoint.com/sites/Demos",
  "SharePoint Folder Path": "/Shared Documents/Documents/",
  "OneDrive Folder Path": "/Temp/",
  "FileDate": "@{utcnow()}"
}
This pattern is incredibly useful. If you ever need to change the destination site or folder, you update it in one place rather than hunting through every action. Think of it as your flow’s settings file.
ComposeBase64OfHeaderImage — Embedding the Header Icon
Next up is a Compose action called ComposeBase64OfHeaderImage. This holds the base64-encoded PNG of the Power Platform icon that appears at the top of the generated document.
Why base64? Because when Word opens an HTML file, it cannot fetch external images from URLs. If you reference an image via https://..., Word will simply show a broken image placeholder. The only reliable approach is to embed the image data directly into the HTML using a data:image/png;base64,... URI.
This Compose action simply outputs the raw base64 string, which gets injected into the HTML template later via the expression @{outputs('ComposeBase64OfHeaderImage')}.
💡 Tip: You don’t need external tools to get base64 — the Get file content action in Power Automate returns file content as base64 already. Point it at a PNG in SharePoint or OneDrive and you’re done. Keep the image small — 256×256 pixels is plenty for a header icon.
ComposeTableRows — Defining Your Data as a JSON Array
This is where the actual data lives. ComposeTableRows is a Compose action that outputs a JSON array of objects, each representing a row in the table. Every object has four properties:
Product— the product nameCategory— the category labelDescription— a short descriptionIconBase64— the product icon as a base64 PNG string
[
  {
    "Product": "Power Apps",
    "Category": "Power Platform",
    "Description": "Low-code platform for building custom business applications...",
    "IconBase64": "iVBORw0KGgoAAAANSUhEUg..."
  },
  {
    "Product": "Power Automate",
    "Category": "Power Platform",
    "Description": "Workflow automation tool for creating automated flows...",
    "IconBase64": "iVBORw0KGgoAAAANSUhEUg..."
  }
]
In this example there are five items — one for each Power Platform product (Power Apps, Power Automate, Power BI, Power Pages, and Copilot Studio). But you could swap this out for any data source — a SharePoint list, a Dataverse table, an API response — as long as it feeds the Apply to Each loop with the same property names.
Apply to Each — Building Table Rows with ComposeHTMLRow
The Apply to each loop iterates over @outputs('ComposeTableRows') and for every item, runs a single Compose action called ComposeHTMLRow.
This Compose action builds one HTML table row (<tr>) per product:
<tr>
  <td>
    <img src="data:image/png;base64,@{items('Apply_to_each')?['IconBase64']}"
         width="50" height="50" alt="Photo" />
  </td>
  <td>@{items('Apply_to_each')?['Product']}</td>
  <td>@{items('Apply_to_each')?['Category']}</td>
  <td>@{items('Apply_to_each')?['Description']}</td>
</tr>
Notice how each column maps directly to a property from the JSON array. The icon column uses an <img> tag with a base64 data URI — again, this is critical for Word compatibility. Every image must be inline.
The beauty of this approach is that Power Automate collects all the Compose outputs from inside the loop automatically. When you reference outputs('ComposeHTMLRow') later, you get an array of all the HTML row strings — one per iteration.
ComposeHTML — The Full Document Template
This is where everything comes together. The ComposeHTML action is a single Compose that contains the entire HTML document — headers, styles, table structure, and a descriptive paragraph at the bottom.
There are a few things that make this HTML special. It’s not just any HTML — it’s Word-compatible HTML, built with specific XML namespaces and CSS that Microsoft Word’s rendering engine understands.
The Word-Compatible HTML Skeleton
The opening tags include three critical XML namespaces:
<html xmlns:o="urn:schemas-microsoft-com:office:office"
      xmlns:w="urn:schemas-microsoft-com:office:word"
      xmlns="http://www.w3.org/TR/REC-html40">
These tell Word to treat the file as a native document rather than a generic web page. Without them, you’d lose page layout control.
CSS Page Layout
Inside the <style> block, there’s a @page rule that sets the document dimensions:
@page WordSection1 {
    size: 8.5in 11.0in;
    margin: 1.0in;
}

div.WordSection1 {
    page: WordSection1;
}
This gives you standard letter-size pages with 1-inch margins — exactly what you’d expect from a Word document.
Preventing Table Rows from Splitting Across Pages
One issue I ran into early on was table rows getting split across page boundaries in Word. The fix is a simple CSS rule:
tr {
    page-break-inside: avoid;
    mso-row-break-inside: avoid;
}
The mso-row-break-inside property is a Microsoft-specific CSS extension that Word respects. Together with page-break-inside: avoid, it ensures each table row stays on a single page.
Dynamic Content Injection
The template has two dynamic expressions:
@{outputs('ComposeBase64OfHeaderImage')}— injects the header icon into the<img>tag at the top@{join(outputs('ComposeHTMLRow'),'')}— joins all the HTML row strings from the loop into a single block and injects them into the<tbody>
The join() expression is key here. Since outputs('ComposeHTMLRow') returns an array of strings, join(..., '') concatenates them with no separator — producing one continuous block of <tr> elements.
The Parallel Branches — DOC and PDF Output
After ComposeHTML has built the full HTML document, the flow splits into two parallel branches that run simultaneously. This is one of my favourite patterns in Power Automate — why wait for one to finish before starting the other?
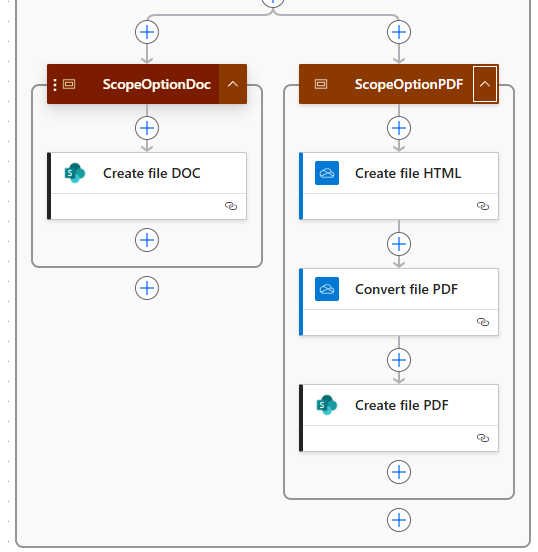
ScopeOptionDoc — Creating the Word Document
This branch is beautifully simple. It contains a single action: Create file using the SharePoint connector.
- Site Address:
@body('Parse_JSON_')?['SharePoint Site URL'] - Folder Path:
@body('Parse_JSON_')?['SharePoint Folder Path'] - File Name:
@{body('Parse_JSON_')?['FileDate']}_DOC.doc - File Content:
@outputs('ComposeHTML')
That’s it. Save the HTML content as a .doc file. When someone opens it in Word, the browser or desktop app recognises the HTML with the Office XML namespaces and renders it as a proper Word document.
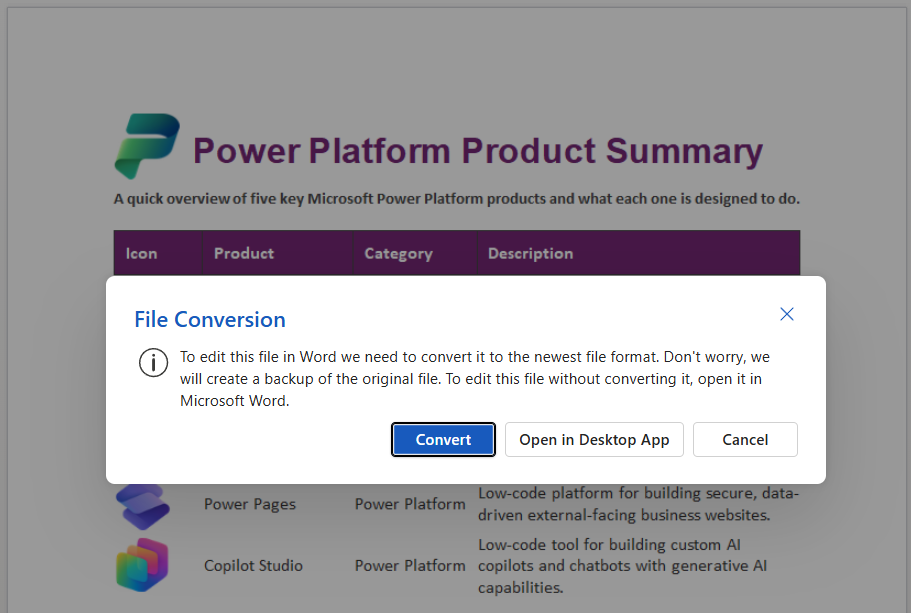
Word will offer to convert it to the modern .docx format — but even without converting, it renders the table, icons, styling, and page layout correctly.
ScopeOptionPDF — Creating the PDF via OneDrive Conversion
The PDF branch is slightly more involved because Power Automate doesn’t have a native “HTML to PDF” action. Instead, we use a clever three-step workaround via OneDrive for Business:
- Create file HTML — Save the HTML to a temporary OneDrive folder as an
.htmlfile - Convert file PDF — Use the OneDrive Convert file action, which accepts a file ID and a target format (
PDF). OneDrive handles the rendering - Create file PDF — Take the converted PDF content and save it to the final SharePoint location
OneDrive (temp HTML) → OneDrive Convert → SharePoint (final PDF)
The OneDrive conversion is a standard connector action — no premium licence required. It’s the same engine that powers “Download as PDF” in OneDrive’s web interface, and it handles the HTML rendering reliably, including tables, images, and CSS.
💡 Tip: Remember to clean up the temporary HTML file in OneDrive afterwards if you don’t want it hanging around. You could add a Delete file action at the end of this scope.
⚠️ Watch Out — 2MB File Size Limit on Convert File: The OneDrive Convert file action has a 2 megabyte file size limit. If your base64-encoded images are high resolution, the HTML file can easily exceed this — remember, base64 encoding inflates file size by roughly 33%. When you hit the limit, you’ll get a
412 Exception occurred while executing within the sandboxerror back from the Convert file action, and the PDF conversion will fail.The good news? The
.docoutput is completely unaffected. Word opens the HTML file perfectly even with large, high-resolution images — so your Word document path will still work fine. It’s only the OneDrive PDF conversion step that enforces this limit.To stay under 2MB, compress and resize your images before base64 encoding them. For product icons and logos, 128×128 or 256×256 pixels at reasonable compression is more than enough. If you absolutely need high-resolution images and PDF output, you’ll need to look at alternative conversion approaches.
The Final Output
Here’s what the finished PDF looks like — a clean, professional document with the Power Platform icon in the header, a styled table with product icons, and a descriptive overview section at the bottom.

The purple header, the product icon column, the structured table — it all renders cleanly in both Word and PDF formats. And the best part? Every piece of this was built with standard Power Automate actions. No premium connectors. No third-party services. No Word templates with content controls.
Key Patterns Worth Remembering
Here are the patterns from this flow that you can reuse in your own document generation scenarios:
- Parse JSON as a config block — centralise your settings so they’re easy to update
- Base64 images are mandatory for Word — external URLs won’t render; always embed images inline
- Word-compatible HTML namespaces — include the
xmlns:o,xmlns:w, andxmlnsattributes on the<html>tag @pageCSS rules — control page size and margins just like a real Word documentmso-row-break-inside: avoid— prevent table rows from splitting across pagesjoin(outputs('ComposeAction'), '')for loop results — cleanly combine multiple Compose outputs into a single string- Parallel scopes for multiple output formats — DOC and PDF branches run simultaneously, halving your wait time
- OneDrive Convert for PDF generation — a free, standard connector that converts HTML to PDF without premium licensing, but beware the 2MB file size limit — high-res base64 images can push you over
Final Thoughts
This approach gives you full creative control over your document layout without the constraints of Word templates or the cost of premium document generation connectors. The HTML-to-Word trick has been around for years, but combining it with Power Automate’s Compose actions, Apply to Each loops, and parallel branching turns it into a genuinely powerful document generation engine.
You can adapt this pattern for invoices, reports, certificates, onboarding packs — anything where you need structured, branded documents generated automatically from data.
If you found this useful, check out my YouTube channel for more Power Automate tutorials and tips!